 Save
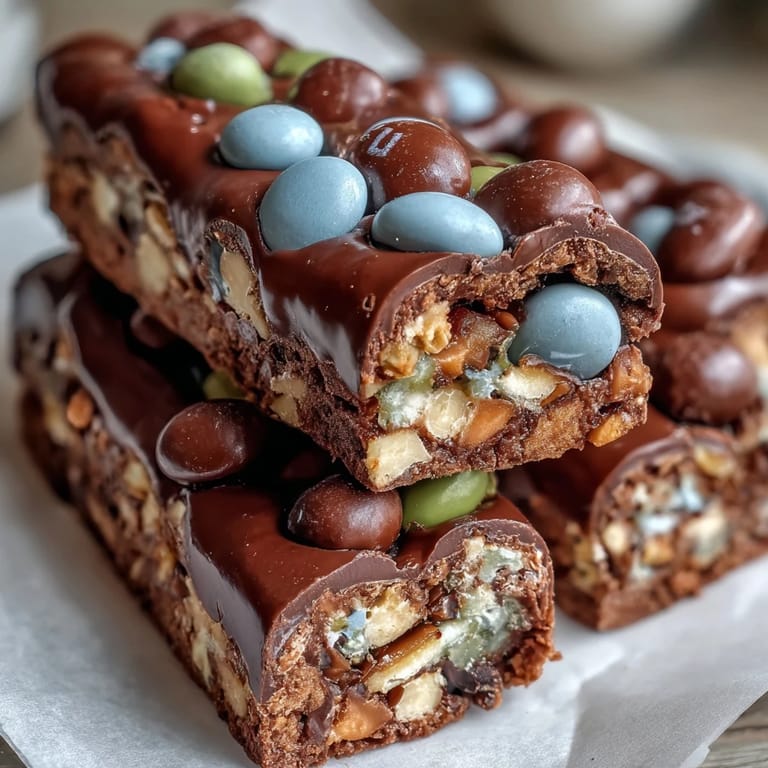
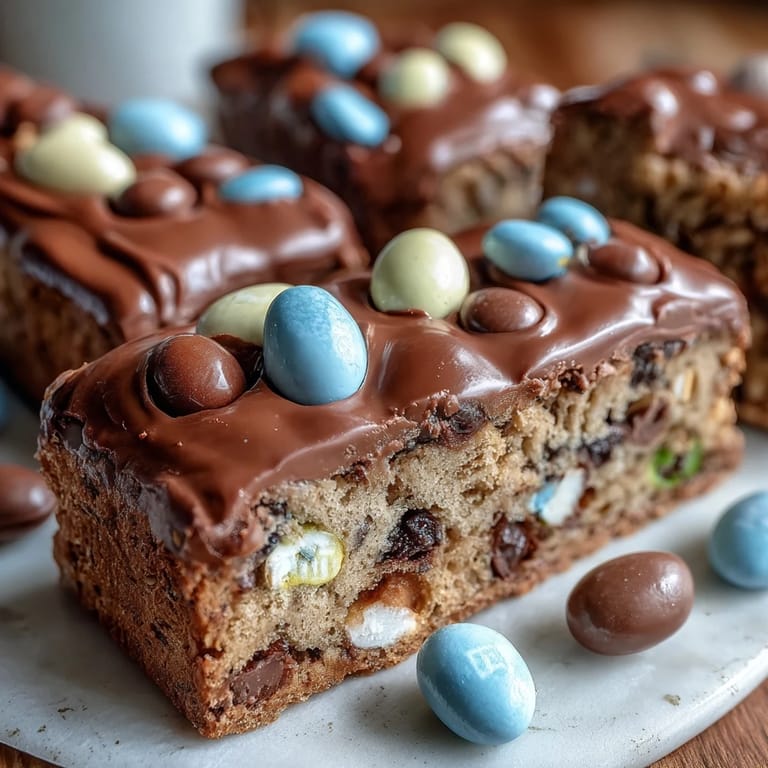
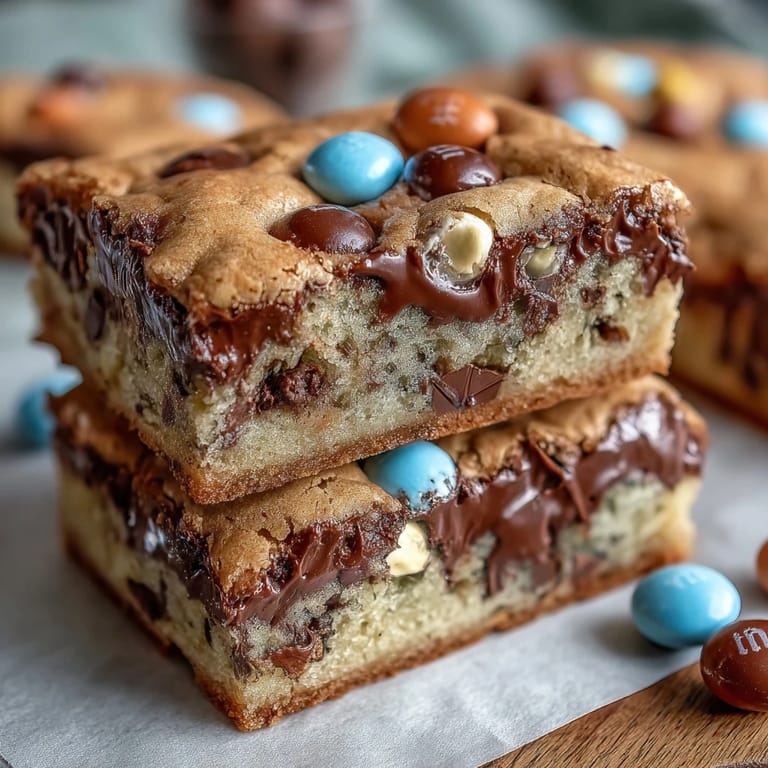
Save My kitchen smelled like melted chocolate and spring when I first threw together these cookie bars on a random Tuesday afternoon. I'd found a bag of Cadbury mini eggs on clearance, and instead of saving them for Easter baskets, I decided to bake them into something chewy and warm. The moment I pulled them from the oven, my roommate wandered in asking what that golden, buttery smell was—and by the time they cooled, the pan was already half gone. These bars became my accidental tradition, the kind of treat that tastes like celebration without needing an occasion.
I brought these to a spring potluck last year thinking nobody would care much about cookie bars when there were fancy desserts around. Instead, they disappeared so fast that someone asked me for the recipe before I even got the empty pan back. It hit me then that people don't always want impressive—they want comforting, colorful, and something that tastes like someone actually enjoyed making it.
Ingredients
- All-purpose flour (2 1/4 cups): This is your base, and measuring it right means the difference between dense bars and ones that have a little lift and chew.
- Baking soda (1 tsp): Just enough to help the bars rise slightly and spread into that perfect texture without making them cake-like.
- Salt (1/2 tsp): Don't skip it—salt wakes up the chocolate and makes everything taste more like itself.
- Unsalted butter (3/4 cup, melted and cooled): Let it cool for a minute or two before mixing so your eggs don't scramble when you add them in.
- Light brown sugar (1 cup, packed): This brings moisture and chewiness, which is exactly what these bars need to stay soft even after a few days.
- Granulated sugar (1/2 cup): The combination of both sugars gives you depth of flavor and that slight crispness on the edges.
- Large eggs (2, room temperature): Room temperature eggs mix in more smoothly and help bind everything together without creating lumps.
- Pure vanilla extract (2 tsp): Vanilla is what makes people say 'what is that flavor' without realizing it's the vanilla doing all the work.
- Cadbury mini eggs (1 cup, chopped): Chop them into uneven pieces so you get different size surprises in each bite—some whole, some crumbly, all delicious.
- Pastel M&Ms (1 cup): Save some for the top because they make the bars prettier and give you color in every slice.
Tired of Takeout? 🥡
Get 10 meals you can make faster than delivery arrives. Seriously.
One email. No spam. Unsubscribe anytime.
Instructions
- Get your oven and pan ready:
- Preheat to 350°F and line your 9x13-inch pan with parchment paper, leaving some hanging over the edges—this is how you lift the whole batch out cleanly without losing a corner to the pan. It takes thirty seconds and saves you from a broken bar situation.
- Mix your dry ingredients separately:
- Whisk flour, baking soda, and salt in a medium bowl and set it aside so when you're ready to combine, you're not searching for things. This also helps distribute the baking soda evenly so you don't get any bitter pockets.
- Cream your wet ingredients together:
- In a large bowl, whisk the cooled melted butter with both sugars until the mixture looks smooth and combined—it should take about a minute. The sugars will start to dissolve slightly into the butter, which is exactly what you want.
- Add your eggs and vanilla:
- Whisk them in completely so there are no streaks of egg white visible. This is where your bars get their structure and richness.
- Fold in the dry ingredients gently:
- Use a spatula to fold the flour mixture into the wet ingredients, mixing only until you don't see white flour streaks anymore—overmixing develops gluten and makes the bars tough instead of chewy. Stop yourself before you think you're done, because a few dry-looking streaks are fine and will come together as you fold in the candy.
- Fold in the Cadbury eggs and half the M&Ms:
- This is where it gets fun—you're distributing little chocolate surprises throughout the dough. Fold gently so the eggs stay in chunks rather than getting crushed into powder.
- Spread and decorate:
- Pour the dough into your pan and use a spatula or your hands to spread it evenly. Sprinkle the remaining M&Ms and a few extra Cadbury egg pieces across the top so every slice looks celebratory.
- Bake until golden and just set:
- 23 to 26 minutes is your sweet spot—the edges should be golden and the center should look almost underdone when you pull it out. If you tap the center and it wiggles slightly, that's perfect; you're going for chewy, not cake.
- Cool completely in the pan:
- This is hard to do because they smell incredible, but wait until they're room temperature before cutting. They firm up as they cool and are much easier to slice cleanly.
 Pin it
 My friend Sarah took one of these bars to her kid's classroom for spring party day, and the teacher texted her later asking if she'd be the official spring treat person from now on. That's when I realized these aren't just bars—they're something that makes people feel thought about, like someone took five extra minutes to make their day a little more colorful.
Why These Bars Beat Regular Cookies
Cookie bars are honest—there's no pretense about shaping them into perfect rounds or worrying if one is bigger than the other. You just pour, bake, and cut, which means less stress and more time actually enjoying what you made. Plus, there's something about eating bars straight from the pan, even if you cut them into neat squares, that feels more casual and real than a plate of cookies.
Storing and Keeping Them Fresh
These bars stay soft for days if you keep them in an airtight container at room temperature—I've successfully eaten them on day four and they were still worth eating. If somehow they do dry out a tiny bit, a slice wrapped in a damp paper towel in the microwave for ten seconds brings back some chew.
Variations and Swaps
The beauty of this recipe is that it's forgiving and flexible, so don't stress if you can't find the exact candies. The structure is solid enough to handle whatever chocolate candy swaps you want to make, and half the fun is discovering your own favorite combination. I've made versions with regular M&Ms in winter and with crushed chocolate eggs in spring, and they're all good because the cookie base is what really matters.
- If Cadbury mini eggs are hard to find, use any mini chocolate eggs or even chopped chocolate bars you have on hand.
- Regular M&Ms work just fine if you can't source pastel colors, or mix in some white chocolate chips for a different sweetness.
- For a less sweet version, reduce the granulated sugar by a quarter cup and it still works beautifully.
 Pin it
 These bars remind me that the best recipes aren't the complicated ones—they're the ones you'll actually make again because they're easy, they taste great, and they make people happy. That's worth more than any fancy technique.
Frequently Asked Questions
- → How can I prevent the bars from becoming too hard?
Underbake slightly to keep soft centers and maintain chewy texture. Removing from oven as soon as edges turn golden helps.
- → Can I substitute other chocolates for Cadbury mini eggs?
Yes, mini chocolate eggs or regular M&Ms provide great alternatives without altering texture greatly.
- → What is the best way to store these bars?
Store bars in an airtight container at room temperature for up to four days to preserve freshness.
- → How do the pastel M&Ms affect the final product?
Pastel M&Ms add colorful bursts and a crunchy texture contrast, enhancing both appearance and bite.
- → Are these bars suitable for vegetarians?
Yes, all ingredients used align with a vegetarian diet, making them a suitable sweet option.