 Save
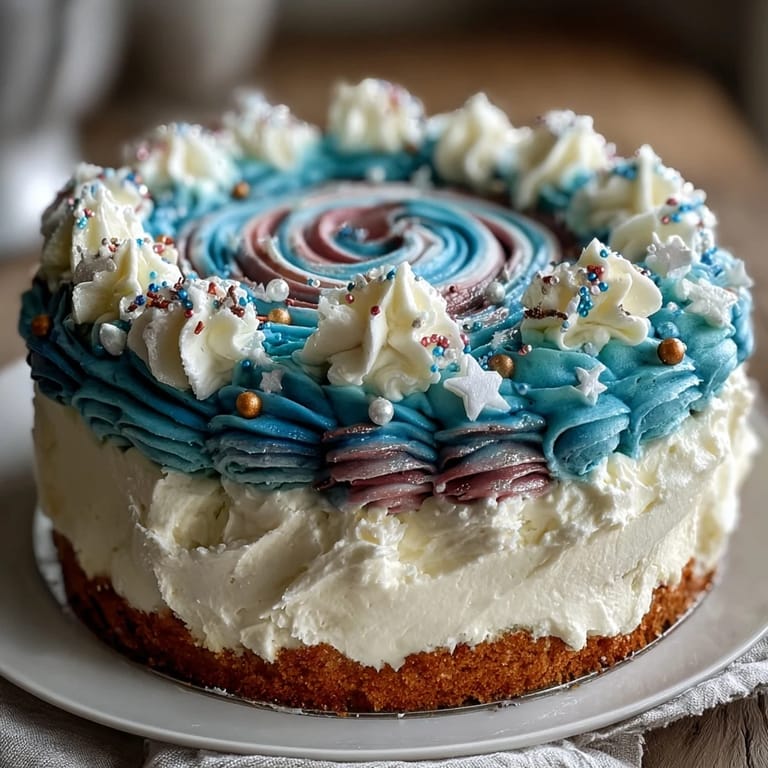
Save My sister called me three weeks before her graduation with a photo of some celestial cake she'd found online, and I knew immediately I had to make something like it for her celebration dinner. There's something about that moment when someone asks you to create something magical for them—it shifts baking from a solitary kitchen task into a promise. I'd never attempted galaxy buttercream before, but the idea of swirling deep purples, teals, and blacks into something that looked like an actual night sky felt like the perfect way to mark her big milestone. The kitchen was quiet that afternoon as I worked through the layers, each color decision feeling oddly ceremonial.
When I finally set that finished cake on the dessert table at her party, the whole room stopped talking for a second. Someone said it looked too beautiful to eat, and my sister's eyes got that shine they get when she's about to cry—happy-cry, the best kind. That's when I understood that this cake wasn't just about technique or pretty colors; it was about standing in my kitchen and thinking about her accomplishment while my hands worked through each step, infusing the whole thing with celebration. A few guests asked for the recipe that night, but mostly people just kept looking at it, which honestly felt like the highest compliment.
Ingredients
- All-purpose flour (2 ½ cups): The foundation of structure—I sift mine before measuring because it catches air and makes the crumb lighter and more forgiving.
- Granulated sugar (2 cups): Creamed with butter until pale and fluffy, this is where your cake gets tenderness; don't rush this step because it really does make a difference.
- Unsalted butter (1 cup plus 1 ½ cups): Softened butter creams better and incorporates air more easily, which is why I always pull mine out of the fridge at least an hour before baking.
- Whole milk (1 cup plus ¼ cup), room temperature: Cold milk can shock your batter and create lumps, so I learned to let it sit on the counter while I prep everything else.
- Large eggs (4), room temperature: They blend more smoothly into the batter when they're warm, creating a more cohesive crumb that stays moist for days.
- Baking powder (2 ½ tsp): Fresh baking powder is essential here—I date mine when I buy it because stale leavening agents sabotage even perfect technique.
- Salt (½ tsp): A small amount amplifies vanilla and creates depth; it's the ingredient everyone forgets but your taste buds will notice.
- Vanilla extract (1 tbsp plus 2 tsp): Use real vanilla, not imitation, because this cake is your canvas and every flavor matters.
- Powdered sugar (5 cups), sifted: Sifting removes lumps that refuse to dissolve and gives your buttercream that silky texture that makes swirling easier.
- Gel food coloring (black, navy blue, purple, pink, teal): Gel holds its vibrancy better than liquid food coloring and doesn't thin your buttercream, a discovery that changed my decorating game.
- Edible gold and silver star sprinkles: These add shimmer and sophistication—I buy from specialty baking shops to ensure they're genuinely food-safe.
Tired of Takeout? 🥡
Get 10 meals you can make faster than delivery arrives. Seriously.
One email. No spam. Unsubscribe anytime.
Instructions
- Prepare your stage:
- Preheat your oven to 350°F and grease three 8-inch round pans with a light hand, then line the bottoms with parchment—this small ritual prevents sticking catastrophes. Let everything sit for a moment while you gather your ingredients because a calm kitchen makes a better cake.
- Cream butter and sugar into clouds:
- Beat softened butter with sugar until the mixture looks pale and fluffy, about 3-5 minutes; this incorporates air and creates the tender crumb you're after. Add eggs one at a time, beating well after each addition so they fully integrate before the next one arrives.
- Combine your dry team:
- Whisk flour, baking powder, and salt in a separate bowl so the leavening distributes evenly throughout. This small step prevents pockets of dense cake that catch you by surprise on the first bite.
- Marry wet and dry in harmony:
- Add the flour mixture in three parts, alternating with the milk and always starting and ending with flour; this gentle approach prevents overmixing, which toughens the crumb. Stir just until combined—lumps are fine, overmixing is not.
- Bake your foundation:
- Divide batter evenly among pans and bake for 30-35 minutes until a toothpick inserted in the center comes out clean. The moment you smell that warm, vanilla-sweetness filling your kitchen is when you know something beautiful is happening.
- Cool with patience:
- Let cakes rest in their pans for 10 minutes—this prevents them from collapsing—then turn them onto wire racks to cool completely. Trying to frost warm cake is how disasters start, so I use this time to wash dishes and mentally prepare for decorating.
- Build your galaxy buttercream:
- Beat softened butter until creamy, then gradually add sifted powdered sugar, milk, and vanilla, beating until fluffy and smooth. The slow addition of sugar prevents lumps and keeps your frosting from becoming grainy.
- Paint with color:
- Divide buttercream into separate bowls and tint each with gel food coloring—use a toothpick to add color drop by drop, because gel coloring is concentrated and a little goes far. I discovered the hard way that adding too much at once turns your beautiful purple into muddy brown.
- Create your galaxy log:
- Place random spoonfuls of each colored buttercream onto plastic wrap, then roll it up to form a log and snip one end to fit into a piping bag with a large round tip. This technique keeps colors distinct while creating that marbled, celestial effect when you pipe.
- Layer and crumb coat:
- Place one cake layer on your serving plate, spread a thin layer of galaxy buttercream, and repeat with remaining layers until all three are stacked. Apply a thin crumb coat all over to trap any loose crumbs, then chill for 20 minutes so the final coat of frosting applies smoothly.
- Pipe your night sky:
- Use your galaxy-colored buttercream log to pipe swirls and patterns across the chilled cake, then gently blend them with an offset spatula in circular motions to create that marbled, cosmic effect. Work slowly and let the colors blend naturally—this is where your cake becomes art.
- Add constellation magic:
- Use white gel food coloring diluted slightly with a tiny bit of water and a food-safe paintbrush to flick on delicate stars across the cake surface, or use a splatter tool for more organic coverage. Step back and admire before adding sprinkles because sometimes less is more.
- Final shimmer:
- Scatter edible gold and silver star sprinkles across the top and sides, then dust with edible glitter or luster dust for that extra touch of shimmer. A graduation cap cake topper is optional but adds that celebratory punctuation if you want it.
 Pin it
 What struck me most wasn't the compliments on how the cake looked, though those were lovely—it was seeing my sister's friends taking photos and actually reading the name on the graduation cap topper, connecting the cake to the moment in a way that felt real. That's when I realized this recipe is really about creating something that tells a story, something that says I see you and I wanted to make this milestone beautiful with my hands and time.
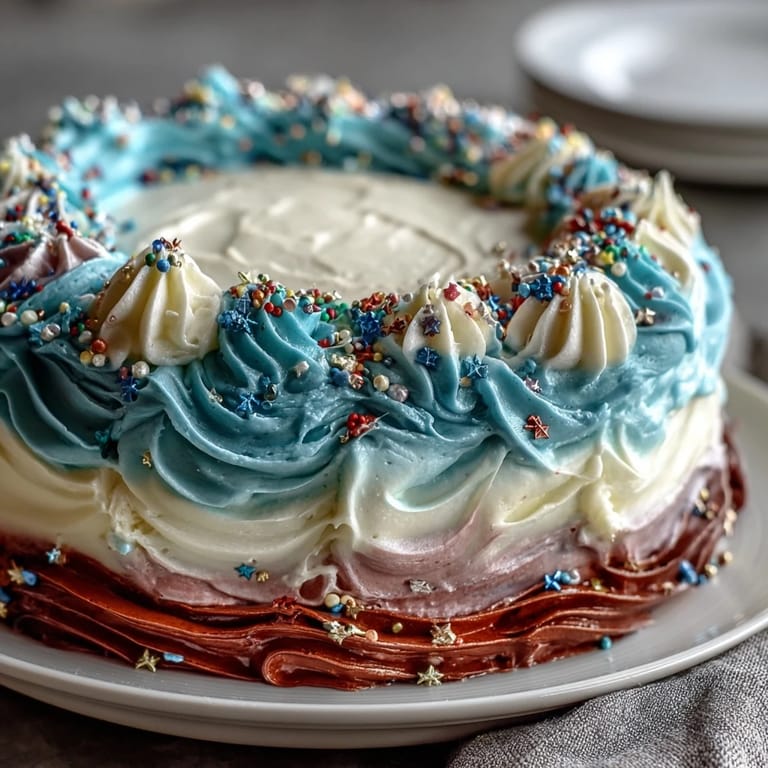
The Galaxy Effect Explained
The magic of this cake lies in understanding that galaxy colors need to sit adjacent to each other, not mixed together into one muddy hue. When I first tried this, I spent thirty minutes blending the colors into something that looked more like a bruise than a night sky, and I learned that restraint is an actual skill. The swirling happens naturally when you pipe colors from your buttercream log—the different hues have already been rolled together, so they blend only where they touch, creating that authentic cosmic marble effect that looks like someone professional decorated it.
Ingredient Substitutions That Actually Work
If you can't find gel food coloring, liquid coloring works but you'll need to use less milk in your buttercream to compensate for the extra liquid it adds—something I discovered by accident when my frosting turned soupy. For a flavor twist that my sister's friends couldn't stop asking about, I've added a thin layer of raspberry jam between the cake layers, which creates this beautiful contrast when you cut into it and adds subtle tartness that balances the sweetness. You can also infuse the buttercream with a teaspoon of almond extract or even a tiny bit of lemon zest, though start conservatively because these flavors intensify as the frosting sits.
Celebrating Beyond the Cake
This cake deserves a moment, so I recommend serving it on a plate with intention rather than rushing through dessert as an afterthought. Set it out before you cut into it so people can actually see the galaxy effect in full light—photographs matter less than the shared experience of looking at something beautiful that someone made for them. A sparkling wine or fruity punch pairs beautifully, and honestly, watching people's faces when they first taste the tender cake and smooth frosting together is the real reward of this recipe.
- Store any leftovers covered in the refrigerator for up to four days, and let them come to room temperature for 30 minutes before serving so the frosting softens and the cake tastes fresh.
- If you're nervous about the piping, practice your swirls on a plate first with a dollop of frosting—it takes pressure off and gives you confidence for the actual cake.
- The edible stars are optional but they transform this from nice to absolutely stunning, so I always recommend splurging on quality ones.
 Pin it
 Make this cake for someone who deserves to be celebrated, or make it for yourself on a day when you need to remember that you're capable of creating something beautiful. The technique might seem complex at first glance, but once you work through it, you'll find that it's actually quite forgiving and wonderfully rewarding.
Frequently Asked Questions
- → How can I achieve vibrant galaxy colors in the buttercream?
Use high-quality gel food coloring for intense shades. Apply colors separately and blend gently to maintain marbled galaxy effects.
- → What is the best way to create edible star decorations?
Decorate with edible gold and silver star sprinkles and flick white gel coloring using a food-safe brush to mimic stars and swirls.
- → Can I prepare the cake layers in advance?
Yes, bake the cake layers ahead and store them wrapped to keep moist. Assemble and decorate closer to serving time.
- → What tools help achieve smooth buttercream application?
Use an offset spatula and piping bags to evenly spread and pipe the buttercream layers for a smooth, marbled finish.
- → Are there flavor enhancements I can add between layers?
Adding raspberry or blueberry jam between layers adds fruity notes that complement the rich buttercream beautifully.