 Save
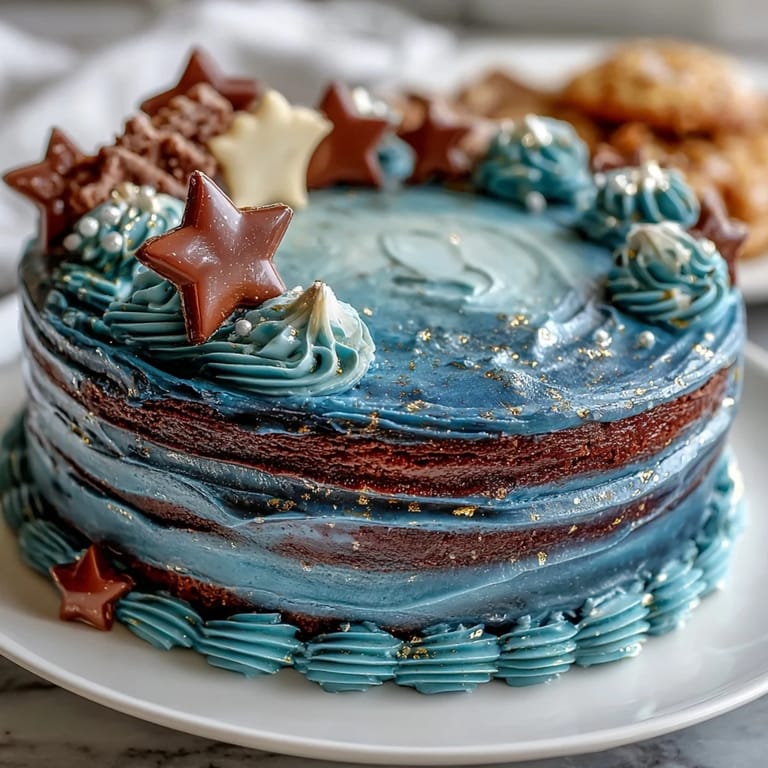
Save The first time I tackled a graduation cake with ombre blue layers and gold accents, my kitchen felt like a whirlwind of excitement, with food coloring bottles and edible gold leaf scattered across every surface. The deep blues reminded me of summer nights, while the buttery vanilla aroma floated through the house. It wasn't a typical day—I was rushing to finish before the ceremony, hoping the result would look as impressive as the vision in my head. What surprised me most was how layering the shades brought a sense of calm amid the chaos. A cake like this quickly becomes its own celebration, even before anyone takes a bite.
I still laugh about how my younger brother hovered near the oven, waiting for a sneak taste, while my hands were stained blue from coloring the batter. We ended up debating which shade of blue looked "most official" for graduation, and even the gold leaf was a last-minute addition after a friend texted me for an update. As we finally sliced the cake, those ombre layers earned so many wide-eyed smiles that I almost forgot the nerves leading up to the big reveal. It was a moment where finishing touches truly made the memory.
Ingredients
- All-purpose flour: Sifting before mixing gives the cake structure without clumps, and I've learned weight measurements help avoid dense layers.
- Baking powder and baking soda: The combination lifts the cake without making it dry; don't skip the balance.
- Salt: A pinch sharpens the sweetness—I never skip it, even in dessert.
- Unsalted butter: Room temperature butter guarantees a smooth batter; impatiently using cold butter can make the cake tough.
- Granulated sugar: Creaming this with butter creates that fluffy crumb every celebration cake needs.
- Eggs: Adding them one by one avoids curdling—sometimes I even warm them slightly in a bowl to help.
- Vanilla extract: The aroma signals "festive" whenever I crack the bottle open.
- Whole milk: Room temperature milk integrates more easily and prevents a separated mixture.
- Blue gel food coloring: Using navy, royal, and light blue creates distinct layers; gel coloring delivers richer shades than liquid.
- Powdered sugar: Sifting is essential or the buttercream turns gritty—trust me, I learned the hard way.
- Milk or cream: Start with less and add gradually; too much thins the buttercream until it slides off the cake.
- Edible gold leaf or gold dust: Be sure it's the edible kind—don't use craft gold leaf for cakes!
- Clear alcohol (vodka or lemon extract): Needed only for gold dust; use sparingly for brush-on streaks.
Tired of Takeout? 🥡
Get 10 meals you can make faster than delivery arrives. Seriously.
One email. No spam. Unsubscribe anytime.
Instructions
- Prepare the pans and oven:
- Grease and line three 8-inch round pans with parchment, then preheat to 350°F. The parchment helps the cakes pop out easily when cooled.
- Mix dry ingredients:
- Whisk flour, baking powder, baking soda, and salt in a bowl so they disperse evenly. The fine powder will feel soft between your fingertips.
- Cream butter and sugar:
- Use an electric mixer to beat butter and sugar until pale and fluffy; the mixture should smell sweet and feel airy.
- Add eggs and vanilla:
- Mix in the eggs one at a time, then stir in vanilla—listen for the sound of the mixer smoothening everything out.
- Alternate flour and milk:
- Add dry and wet ingredients in turns, starting and ending with flour. The batter should look creamy and thick but not overstirred.
- Divide and color:
- Pour batter into three bowls, tinting each with blue gel coloring from light to dark. You'll notice the ombre effect come to life right before your eyes.
- Bake the layers:
- Spread the batters into the pans and bake for 25–30 minutes. If it springs back when pressed lightly, it's ready—cool before removing.
- Make buttercream:
- Beat soft butter until creamy, add sifted powdered sugar, vanilla, salt, and milk a little at a time. The buttercream should be thick enough to hold its shape but soft enough to spread.
- Tint buttercream:
- Reserve one cup for the crumb coat, and tint the rest dark blue for the final finish. Adjust shades as desired for the ombre look.
- Assemble and layer:
- Level cakes if needed, then layer from darkest to lightest shade with buttercream in between. Smooth out each layer gently so they don't slip.
- Apply crumb coat:
- Spread reserved plain buttercream thinly over the cake and chill for 20 minutes. This helps lock in crumbs for a clean final look.
- Decorate with final buttercream:
- Frost all over with the dark blue buttercream, blending lighter tones if desired. Use an offset spatula for smooth edges or gentle gradients.
- Add gold accents:
- Apply gold leaf or brush gold dust mixed with clear alcohol onto the chilled cake. The shimmer is delicate, so handle it gently.
- Finishing:
- Chill the cake until ready to serve. Keep it in the fridge if you're prepping ahead for the big event.
 Pin it
 It was during the graduation party, surrounded by laughter and proud parents, that this cake took on a new meaning: everyone gathered just to watch the first slice reveal those blue ombre layers. I realized then how food becomes a centerpiece for big occasions, not just a dessert.
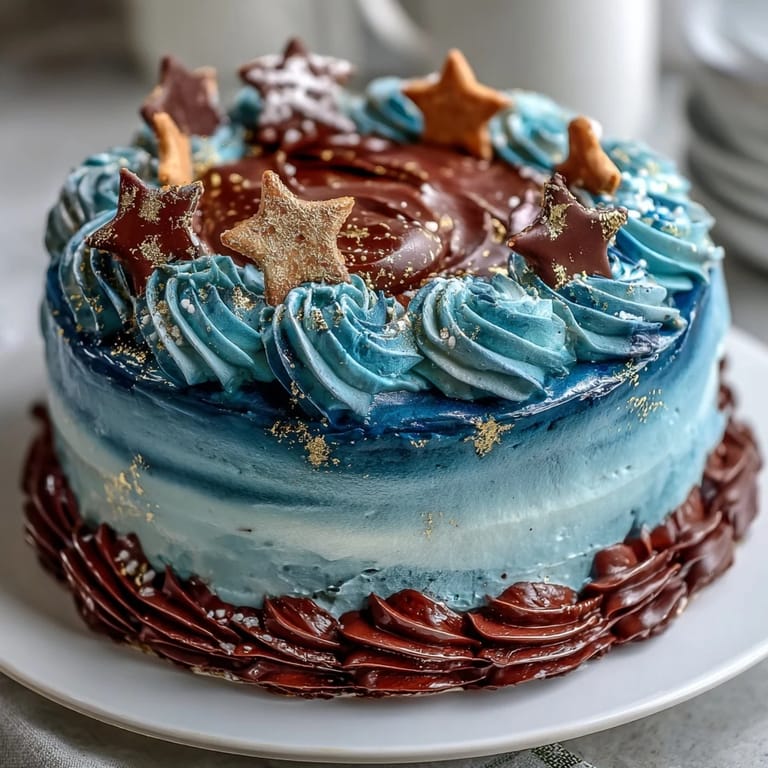
How to Nail the Ombre Gradient
Getting the ombre effect right is about gradually building intensity—start with small dabs of coloring and adjust until you're satisfied with each shade. Sometimes I blend leftover batter from the darkest layer into the lighter batch for a softer transition. Mixing and matching the blues feels like painting, so don't worry if it's not perfectly even; a little variation adds personality.
Choosing the Right Gold Accents
Edible gold leaf is delicate but dramatic, so apply it with dry fingers or a soft brush—don't use water as it can dissolve the shimmer. If you opt for gold dust, just a splash of vodka or lemon extract will transform it into paint; test on a scrap of parchment first to check texture. Graduation-themed toppers or chocolate stars make great additions if you want to personalize the cake further.
Graduation Cake Success Checklist
Organizing your workspace before you start really pays off, especially with so many shades and decorations. Keep your food coloring away from delicate items and line up pans ahead of time to avoid last-minute confusion. Remember to double-check that all gold decorations are edible—the packaging isn't always crystal clear.
- Have extra blue food coloring on hand in case you want to deepen the colors.
- Let your butter and eggs reach room temperature for optimal texture.
- Clean your offset spatula between colors to prevent streaking.
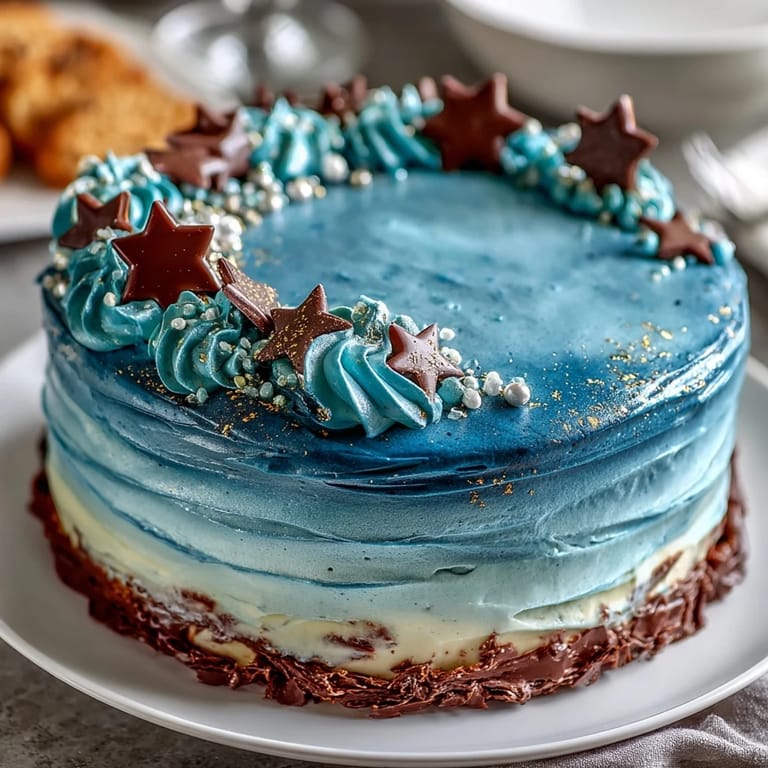 Pin it
 This cake brings celebration to the table and is always a showstopper, whether for graduation or any milestone worth the effort. Don't stress about perfection—even a few gold flecks and vibrant blue layers turn it into something unforgettable.
Frequently Asked Questions
- → How can I achieve a smooth ombre effect on the cake?
Divide the buttercream and tint with varying blue shades. Blend the colors gently as you frost for a gradient transition.
- → What makes the gold accents edible and safe?
Use edible gold leaf or edible gold dust, ensuring decorations are specifically labeled for food use.
- → How do I layer the blue cake evenly?
Level each cake layer before assembly. Stack from darkest to lightest blue, using buttercream between layers for stability.
- → Can I make this cake ahead of time?
Yes, bake and assemble in advance. Store the finished cake chilled and add gold accents before serving.
- → What frosting works best for ombre cakes?
Vanilla buttercream tinted with gel food coloring blends smoothly and allows for precise ombre shading.